


In this tutorial we will show how you can customize the WinX menu from Windows 8.1 using a free application called Win+X Menu Editor. What you are about to learn also applies to Windows 8 or Windows 10. After you read this article, you will be able to add or remove items from the WinX menu, or create and configure new groups. We will walk you through the complete process of downloading, installing, starting and using the Win+X Menu Editor application.
What Is The WinX Menu?
WinX draws its name from the many websites calling it like this, since Microsoft does not provide an official name for it. It is basically a power user interface that allows access to administrative features of Windows 8, Windows 8.1 or Windows 10. You can read more about it here: What Is The WinX Menu & How To Access It?.
How To Access The WinX Menu
To access the WinX menu, you must right-click the Windows button on the lower left corner of your screen. You can also use the keyboard combination Windows + X. In Windows 8.1, the initial WinX menu will be shown with three groups containing administrative tools like Task Manager, Disk Management, Control Panel and others.

The problem is that users are not allowed to arrange, add or delete items directly from this menu. There are two ways for doing this: go into your Windows folders and manually create new folders for WinX groups, new shortcuts or delete existing items. The second is to use a free application like Win+X Menu Editor that will save you the trouble of going into Windows system folders to do all the above mentioned actions.
How To Download & Install The Win+X Menu Editor
Our weapon of choice for this tutorial is the Win+X Menu Editor application. You can download it from here. The download is free of charge, but donations are welcomed and encouraged. Once you click the download button, the application will be saved into your default Downloadsfolder, in an archive file named WinXMenuEditorRelease.zip. Extract it and you will find two versions of this application, for both 32 and 64 bit users. The first one can be located into the x86 subfolder, while the 64 bit version is available in the x64 subfolder. Both versions are identical in terms of features and the way they are used.

How To Start The Win+X Menu Editor
You can start Win+X Menu Editor by running the WinXEditor.exe file from the appropriate subfolder (x86 or x64).
Once you have opened this application, you will be able to see all your WinX current items listed, as well as all the managing options that available: add a programs, create a group, remove and restore defaults.

Important: In the right corner of the application screen you can see the Restore defaults button. You can play around with the settings of this application and, if you are not satisfied with the result, you can always use this button and go back to the original WinX menu.
How To Add New Items To The WinX Menu Using Win+X Menu Editor
All right! So you have started the Win+X Menu Editor and you want to add new items to the WinX menu. Click or tap the "Add a program"menu and the following submenu is shown:

There are four options available:
- Add a program - use this to add any installed program from your computer.
- Add preset: Shutdown options, Services, Paint, Calculator, Windows Media Player, Snipping Tool and Notepad.
- Add a Control Panel item - use this to add any Control Panel item to this menu.

- Add an Administrative Tools item - use this to add administrative tools from Windows.

For any change to take place in the WinX menu, you must use the Restart Explorer button that is located in the right-lower corner of the Win+X Menu Editor.
To give you an idea of how this all works, we will walk you through the process of adding a program into the WinX menu: Internet Explorer.
First, click or tap on "Add a program" option in the menu with the same name. The Open window is opened. To find Internet Explorer, go to"C:\Program Files\Internet Explorer". Select iexplore.exe and click Open.

A Rename window is opened, asking you to enter the name that you want to use for this new entry.
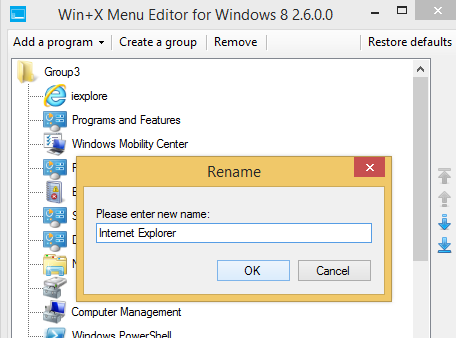
Type it and click OK. Then, click the Restart Explorer button in the Win+X Menu Editor to apply this change.
The new entry will then be available in the WinX menu.

How To Add A New Group To The WinX Menu
Open the Win+X Menu Editor application and click the Create a group button. No messages will appear, instead a new group is created automatically.

In this example, a new Group4 group was created. You can repeat this step to create as many groups as you want.Once you have created a new group, you can add new items to it by selecting it and then using the "Add a program" menu, as we have demonstrated in the previous section of this tutorial.
How To Remove An Entry From The WinX Menu
Items from the original list of entries, new programs added by you or even groups can be easily removed from the WinX menu. Select the item or group that you wish to remove and click or tap the Remove button from the Win+X Menu Editor.

Be careful when clicking or tapping Remove, because you will not be prompted with a warning message if you delete individual items, only when removing groups. If you accidentally delete something and you want it back, try using previous sections of this tutorial to add the item back or use the Restore defaults button.
Win+X Menu Editor will not remove any programs or features from your Windows operating system, it will only change the settings and the appearance of the WinX menu. You can always restore the original settings of your WinX menu by using Restore defaults.
Conclusion
If you follow the steps described in this tutorial, you will be able to create your own entries, customize groups and delete unwanted items from the WinX menu. By using the Win+X Menu Editor application you will be saved the trouble of having to go to Windows system folders and manually create shortcuts or new folders in order to customize this menu. Try it out and let us know how well it works for you.
0 comments:
Post a Comment